

Making Bone Broth for Dogs
Posted by Michael Peterson on
Domesticated animals such as dogs and house cats tend to eat either commercially prepared foods or home cooked meals. Two areas that tend to be neglected in both are calcium from bone meal and collagen from ligaments and connective tissues. Collagen is very useful for animals that are showing the effects of arthritis or are suffering digestive disorders. Just as leaky gut has made it’s way into discussions regarding human health, it is also an issue for animals. This can be aggravated by the use of antibiotics and other medications. An easy way to get more collagen into your dogs is by adding bone broth to their diet. Since most commercially prepared bone broths contain onions or added sodium, I prefer to make it at home simply using beef bones and water.
I use a combination of bones that contain marrow and some neck bones which contain more cartilage and connective tissues. These are easily obtained by asking at the meat counter of most grocery stores or from a local butcher. Grass fed beef is the best choice but they tend to be much harder to find unless you have access to a local source of grass fed beef.

Place them in a deep pot to allow them to be completely covered in water.

Bring water to a boil. Turn it down to a simmer and then scoop out any garbage that floats to the top. It’s usually just remnants from the bones being cut.
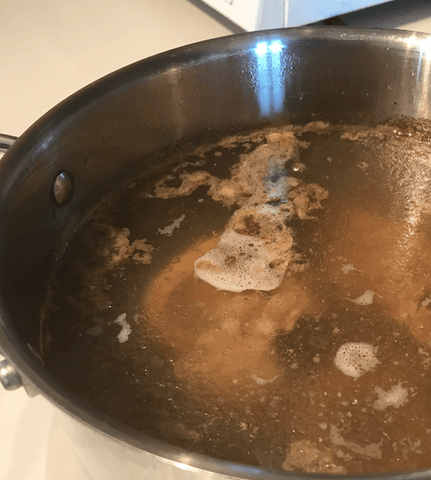
Then add a couple tablespoons of vinegar which will help with releasing the collagen from the bones. This will not affect the taste.

Let it simmer for 48 hours. I leave it on low on the stove, but some people feel safer using a crock pot which will work as well. This will make your whole house smell wonderful if you like the aroma of cooking homemade soup! When it’s done simmering, remove it from heat and let it cool down. Then remove the bones and all other chunks that have accumulated. I run it though a course strainer. Here is what the bones should look like when finished. You will notice that most of the marrow is missing from the bones which is what you want. Some people prefer to remove the remaining marrow and add it to the broth.

After straining it into a bowl it should look like this.

You will notice there is a significant amount of fat present which would be fine for a healthy dog, but if your animal has pancreatitis you will want to refrigerate this for an hour until all the fat solidifies on top.

Once this has occurred, simply skim the fat off the top and discard leaving a nearly fat free bone broth like this:

Since there are no preservatives, most sources recommend only storing this for a few days in the refrigerator, so I transfer it into an ice cube tray (the one shown is a silicone tray for large cubes but any will do). Once they have frozen, transfer them to a freezer bag for long term storage, up to a year in the freezer.

This way you can thaw out a cube anytime and use it for supercharging your GastroElm Plus mixture or adding it directly to their food. How much you add to the food depends upon the size of your dog, but I use it like a gravy and the dogs love it!
If your dog has an issue with beef, you can use meaty chicken bones, turkey bones, buffalo or wild game.
If you have any questions simply reply in the comments below!
To a healthier pet!
Michael Peterson
GastroElm.com